PROJECT: Duke Academy
About the Project
My team of 4 Computer Science students were tasked with enhancing a basic Command Line Interface (CLI) desktop addressbook application for our Software Engineering project. We chose to morph it into a coding practice application called Duke Academy.
Duke Academy is written in the Java programming language and the Graphical User Interface (GUI) of the application is created with JavaFX. It relies primarily on Command Line Interface (CLI) as its primary input for user commands, which means users will mostly be typing to perform specific functions instead of clicking with a mouse (unlike GUI).
Duke Academy is designed for both coding students and educators alike. It is equipped with a library of programming questions related to the field of Data Structures and Algorithms for students to practice their coding skills and allows educators to set their own problem statements for their students to attempt. This enhanced application also allows students to run their programs within the app itself, track their programming practice history and make personalized notes all in one application, without the need for external tools.
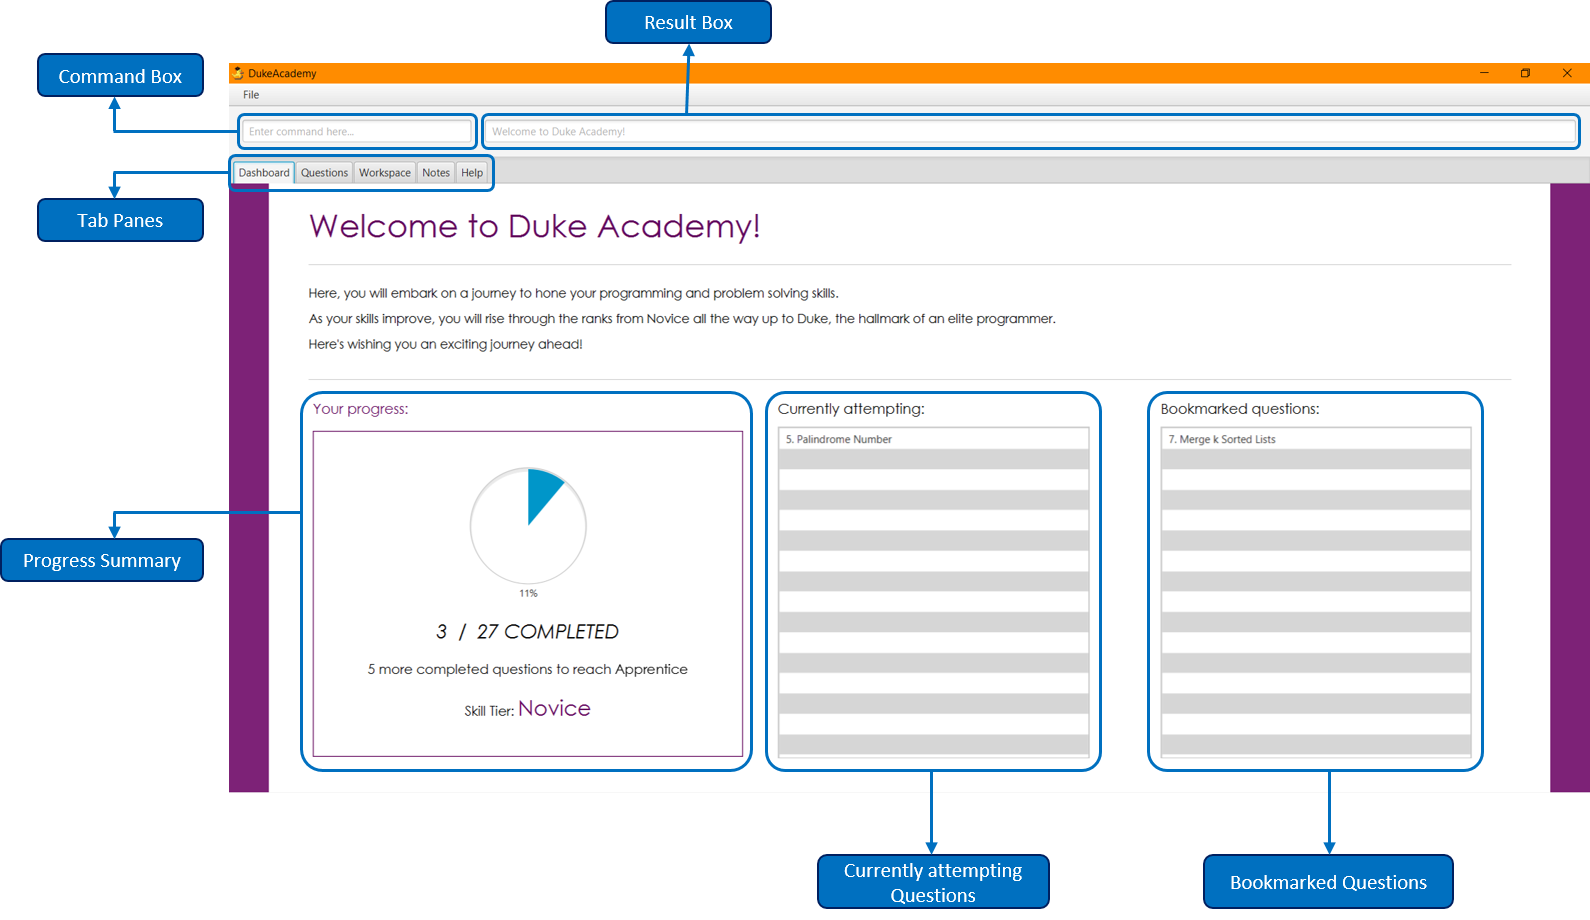
This is how our project looks like:
Summary of contributions
This section shows a brief overview of my contributions to the project. A summary of my coding, documentation and other relevant details will be listed below.
Major enhancement added: I have integrated a built-in text editor with a line counter component.
-
What it does:
-
The built-in text editor allows users to code out their solutions internally within Duke Academy itself.
-
It is also fully capable of performing auto-indentations for the user.
-
The text-editor also has a line counter component which helps the user to keep track and manage his code for convenient reference.
-
-
Justification (Text Editor): This feature improves the product significantly because users do not need to source for an external text editor to code out their solutions for problems and can instead do everything within Duke Academy itself. This then increases the productivity of users as they would not need to constantly switch between the external editor and Duke Academy while attempting questions, providing a hassle-free coding experience.
-
Justification (Auto-Indentation): This quality-of-life feature significantly increases the user coding experience in Duke Academy because it helps users organize and compartmentalize their code automatically. Having auto-indentation means that users do not need to key in 4 spaces manually after every code block, and thus it helps the user uphold code readability without the user having to do anything on their part.
-
Justification (Line Counter): This feature adds significant value to the product because it allows users to keep track of the micro-details in their code. For example, should anything go wrong with their code (e.g. compilation error), they can quickly trace down the source of the bug and make the necessary changes efficiently and conveniently without having to trace through line-by-line.
-
Highlights: This feature is designed to imitate, as closely as possible, the functions of an Integrated Development Environment (IDE) editor. The implementation of this feature was exceptionally challenging as there were no exact tutorials on how to design a text editor with the above mentioned features specifically, and thus it was only made possible by putting together all the small parts.
Minor enhancement: Added a UI format for QuestionCard.
-
What it does: Displays a summary of the question with a clean look that fits the theme of DukeAcademy. It is redesigned to reflect the topics of the selected question, and the attributes such as whether it is attempted by the user and its difficulty level.
-
Justification: This provides the user with adequate information at a glance to help him decide if it is a question he/she is qualified to attempt or is it a question that has been attempted.
-
Highlights: This was easy to implement because it only requires a slight redesign. This redesign was also necessary because the old Contact Card used in AddressBook was insufficient in reflecting certain details of a question while also having irrelevant fields.
Minor enhancement: Redesigned Dashboard (home) page to fit the theme of DukeAcademy more.
Minor enhancement: Ensured that all UI components scale properly and appropriately with window size.
Minor enhancement: Configured the dimensions of the application window to prevent users from minimizing the window too much such that the inner components become unusable.
-
Code contributed: [RepoSense Report]
-
Other contributions:
-
Project management:
-
Managed releases
v1.2.1andv1.3(2 releases) on GitHub -
Assigned project milestones for
v1.2
-
-
Enhancements to existing features:
-
Community:
-
Reported bugs and suggestions for other teams in the class (PE Dry Run)
-
-
Contributions to the User Guide
We had to update the original AddressBook User Guide with instructions for the enhancements that we had added. The following is an excerpt from our Duke Academy User Guide, showing additions that I have made. |
Questions
The Questions tab contains a list of all the available questions and also a window to view your problem statements.
You can use commands such as browse and find to filter through the list of questions in order to find what you
are looking for. browse can lookup any keywords in titles, difficulty, description, topics, etc. find only finds by titles. (View Features for more details.)
-
To quickly see all questions, enter
showallinto the Command Box. -
To view the problem statement for a question, enter
view <Qn Index>. The problem statement will then be displayed on the right.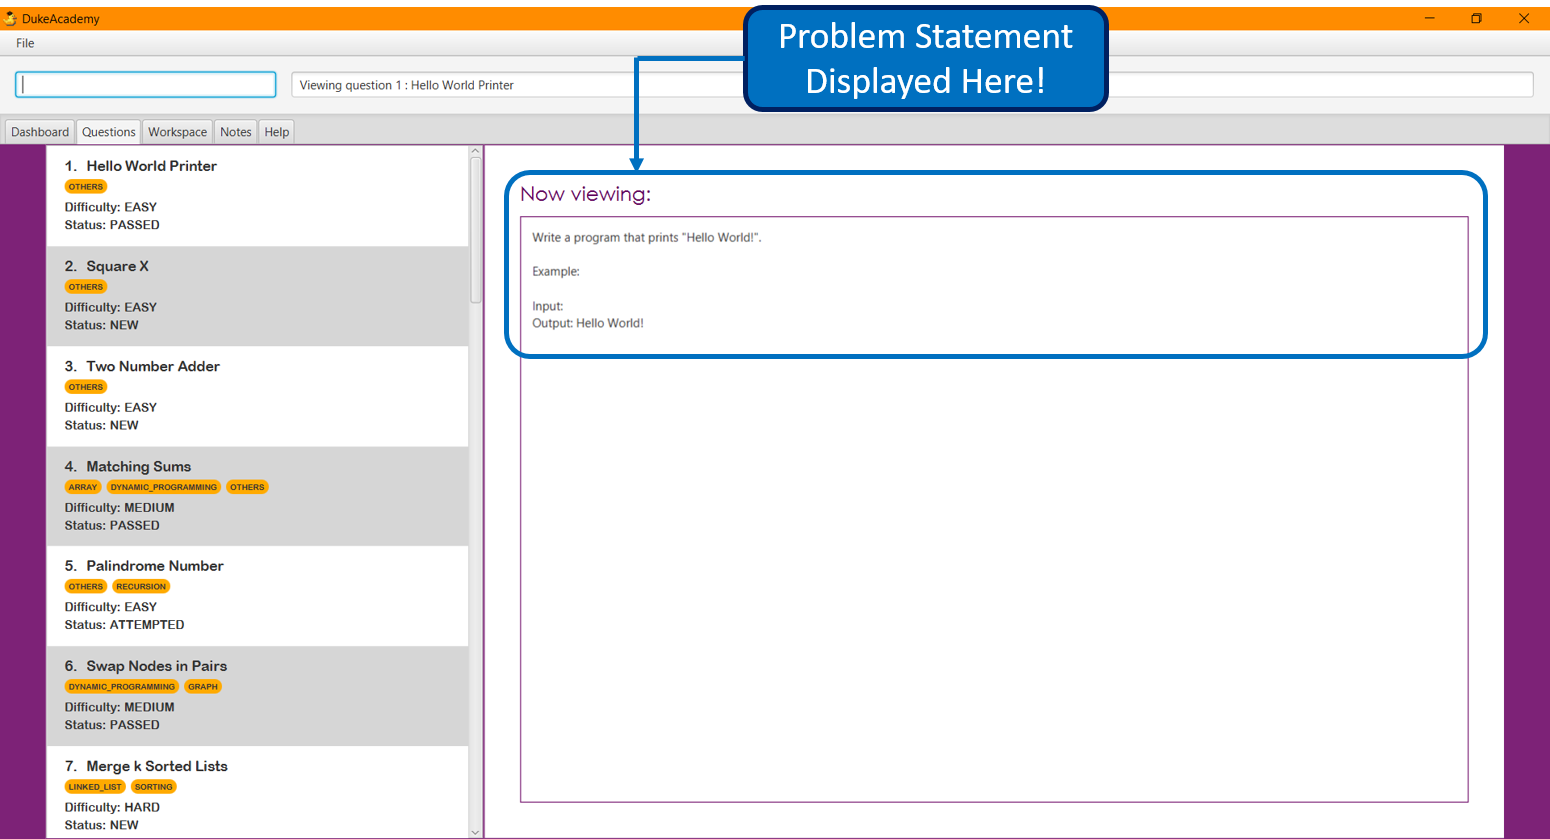
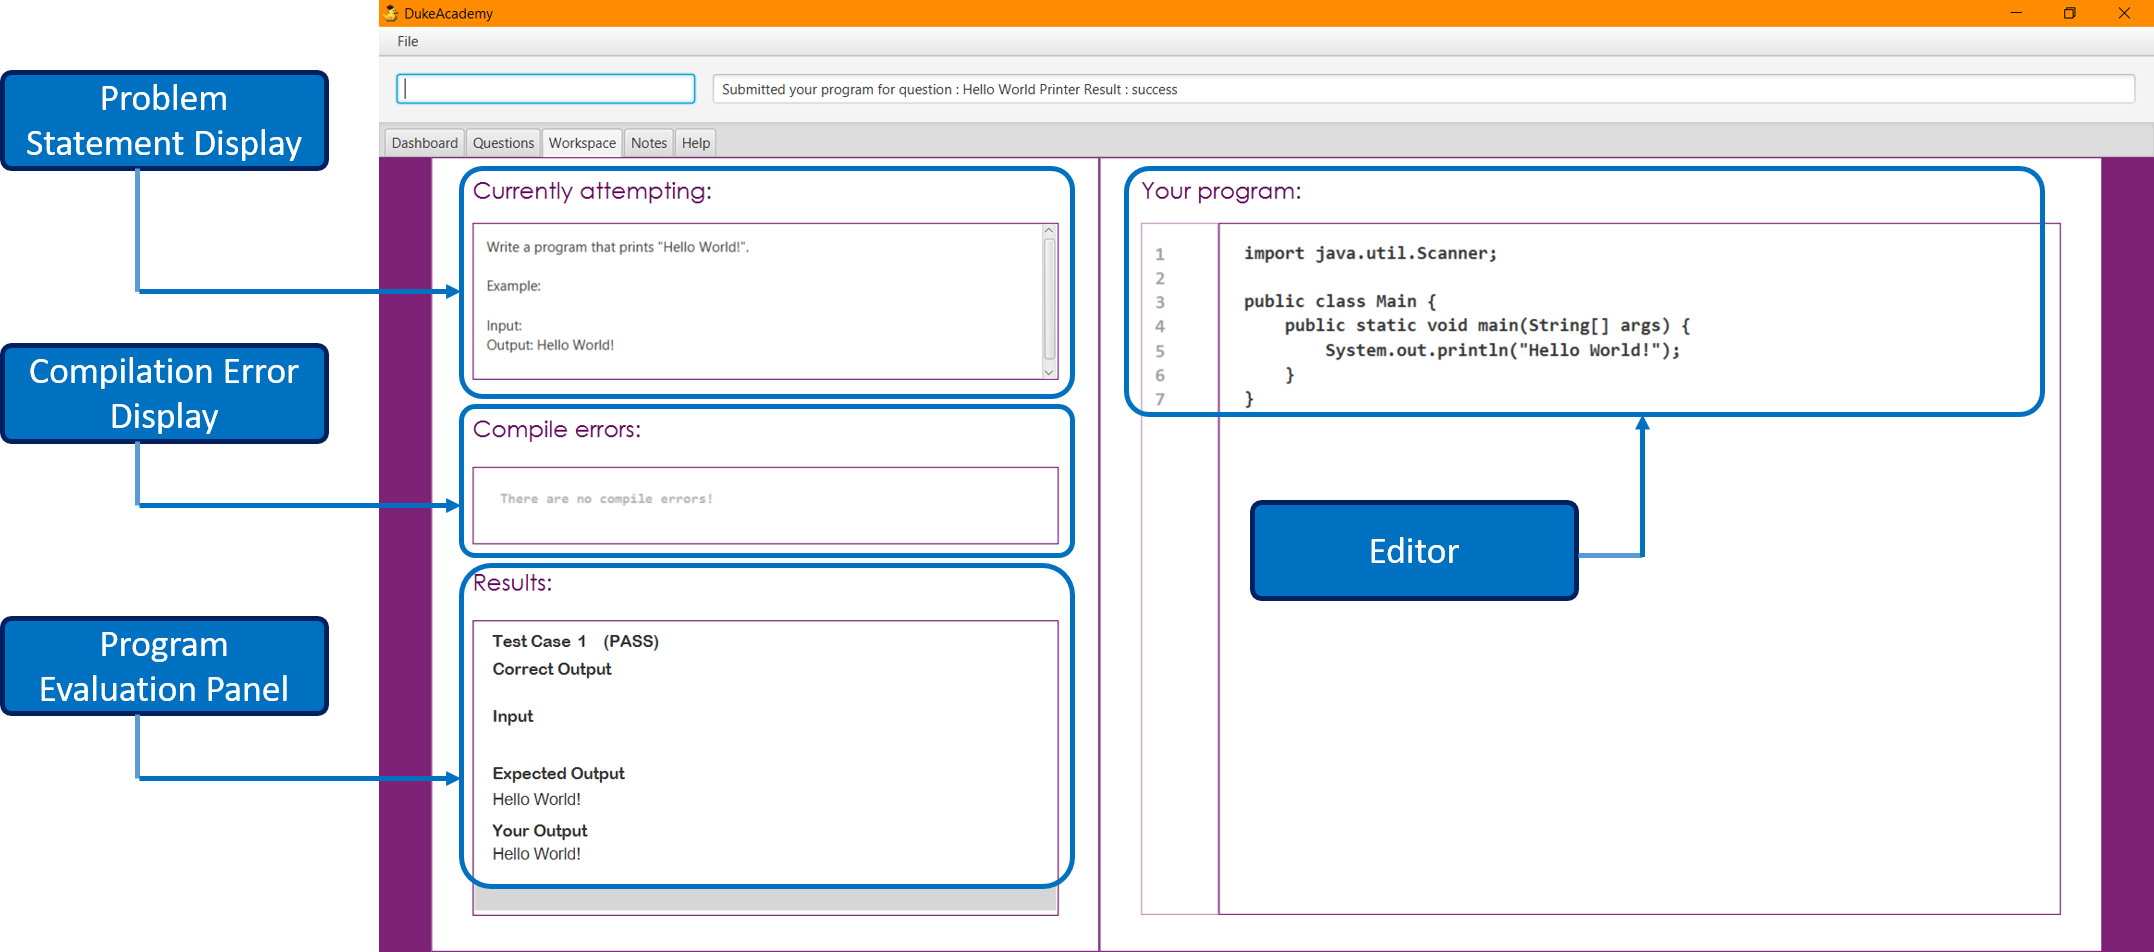
Workspace
The workspace is where you will work on the various questions.
-
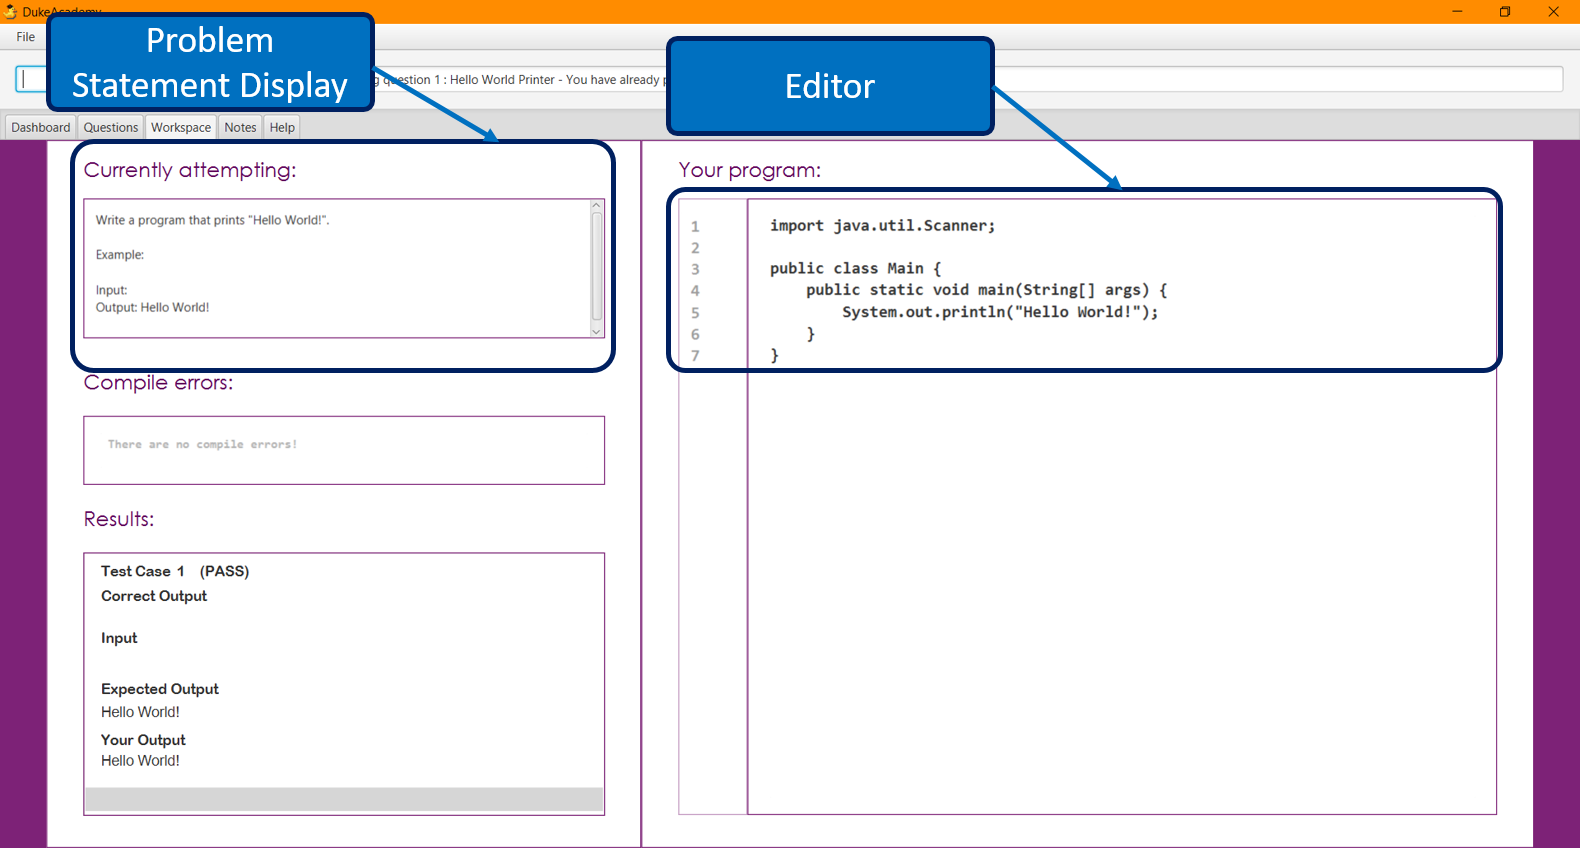
Problem Statement Display
Displays the question that you are currently attempting.
-
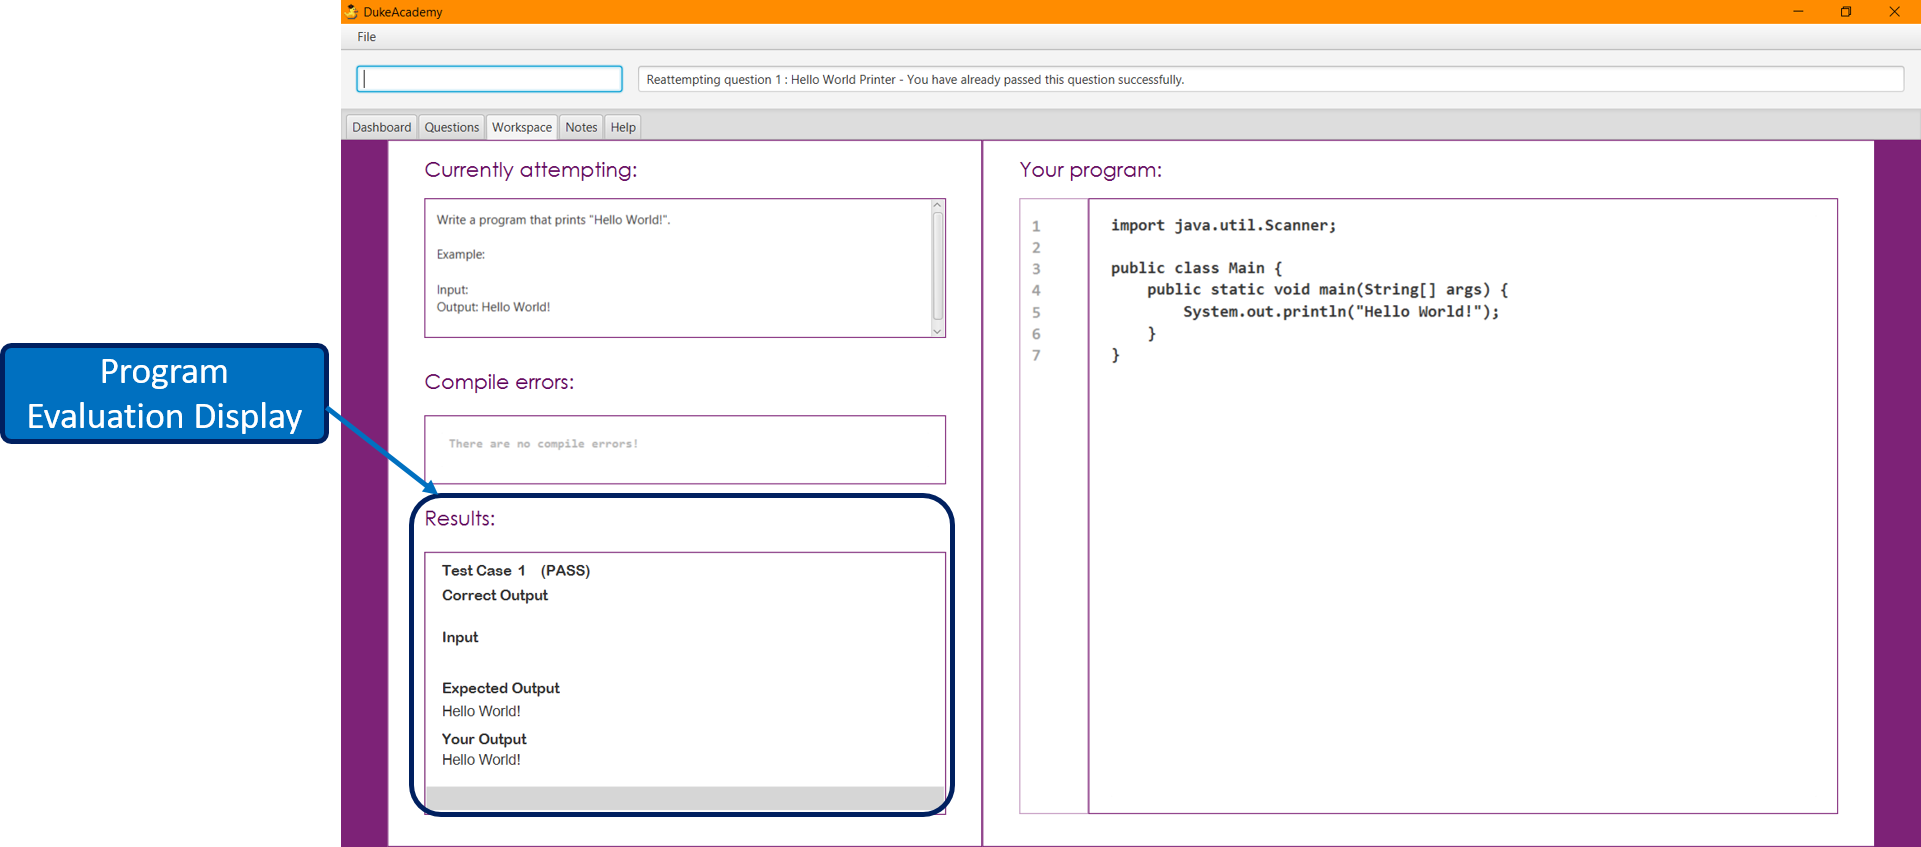
Program Evaluation Panel
Displays the correctness of your program when evaluated against the pre-defined list of test cases tied to the question you are solving.
-
Editor
A built-in editor for you to write your code.
To submit your attempt, enter submit into the Command Box.
To begin your attempt on a question, enter attempt <Qn Index> into the Command Box.
To submit your attempt, enter submit into the Command Box.
Features
Command Format
-
Commands are entered into the CommandBox
-
Words within square braces
[]are the parameters to be supplied by you, the user.e.g. in
attempt[id],idis a parameter which can be used asattempt 1. -
Parameters are compulsory.
-
Parameters with
… after them can accept multiple entries.e.g.
browse [category]…can be used asbrowse easy linkedlist hashtable recursion(i.e. 4 entries), etc.
Find question by title : find
Searches for question of which the title contains strictly the keywords entered.
Format: find [keyword]…
Examples:
-
find binary search tree
Finds and displays all questions containing the substrings "binary", "search" and "tree" in their title. -
find fizz buzz
Finds and displays all the questions containing the substrings "fizz" and "buzz" in its title, but not questions with titles such as "fizzbuzz".
Browse by keywords: browse
Searches through all questions with the specified keyword(s). A question is listed as a search result as long as it contains one of the keyword(s) in their title, topics, description, status or difficulty.
Format: browse [keywords]…
Examples:
-
browse hashtable linkedlist
Finds and displays all questions that contain "hashtable" and "linkedlist". -
browse number
Finds and displays questions that contain strictly the keyword "number".Questions that do not and instead contain words with "number" as a substring of a word in their title, topics, description, status or difficulty will not be displayed.
Viewing the problem statement : view
Displays the problem statement of the question.
Format: view [id]

Examples:
-
view 1
Displays the question with the id "1" in the right side window of the GUI, as shown in the above picture.
Attempting a question : attempt
Navigates to the Questions tab where you can code your solution to solve the problem statement.
Format: attempt [id]
Submitting your answer: submit
Submits your solution. Your code will be compiled and run against test cases. The results will be displayed in the ProgramEvaluationDisplay on the bottom left of the GUI.
Format: submit
Contributions to the Developer Guide
Given below are sections I contributed to the Developer Guide. They showcase my ability to write technical documentation and the technical depth of my contributions to the project. |
Editor Panel
The editor panel is the panel right next to the Problem Display Panel and the Program Evaluation Panel. The editor panel consists of two parts: The main text editor and the line counter component.
The main text editor is where the user codes and is responsible for feeding the text input to the Program Submission
Logic Manager for compilation of the user-written code. It is capable of performing auto-indentations for the user and
this is achieved by overwriting the function of the ENTER key. Through helper methods available in Editor.java, the
number of unclosed braces can easily be counted so as to perform the appropriate indentations.
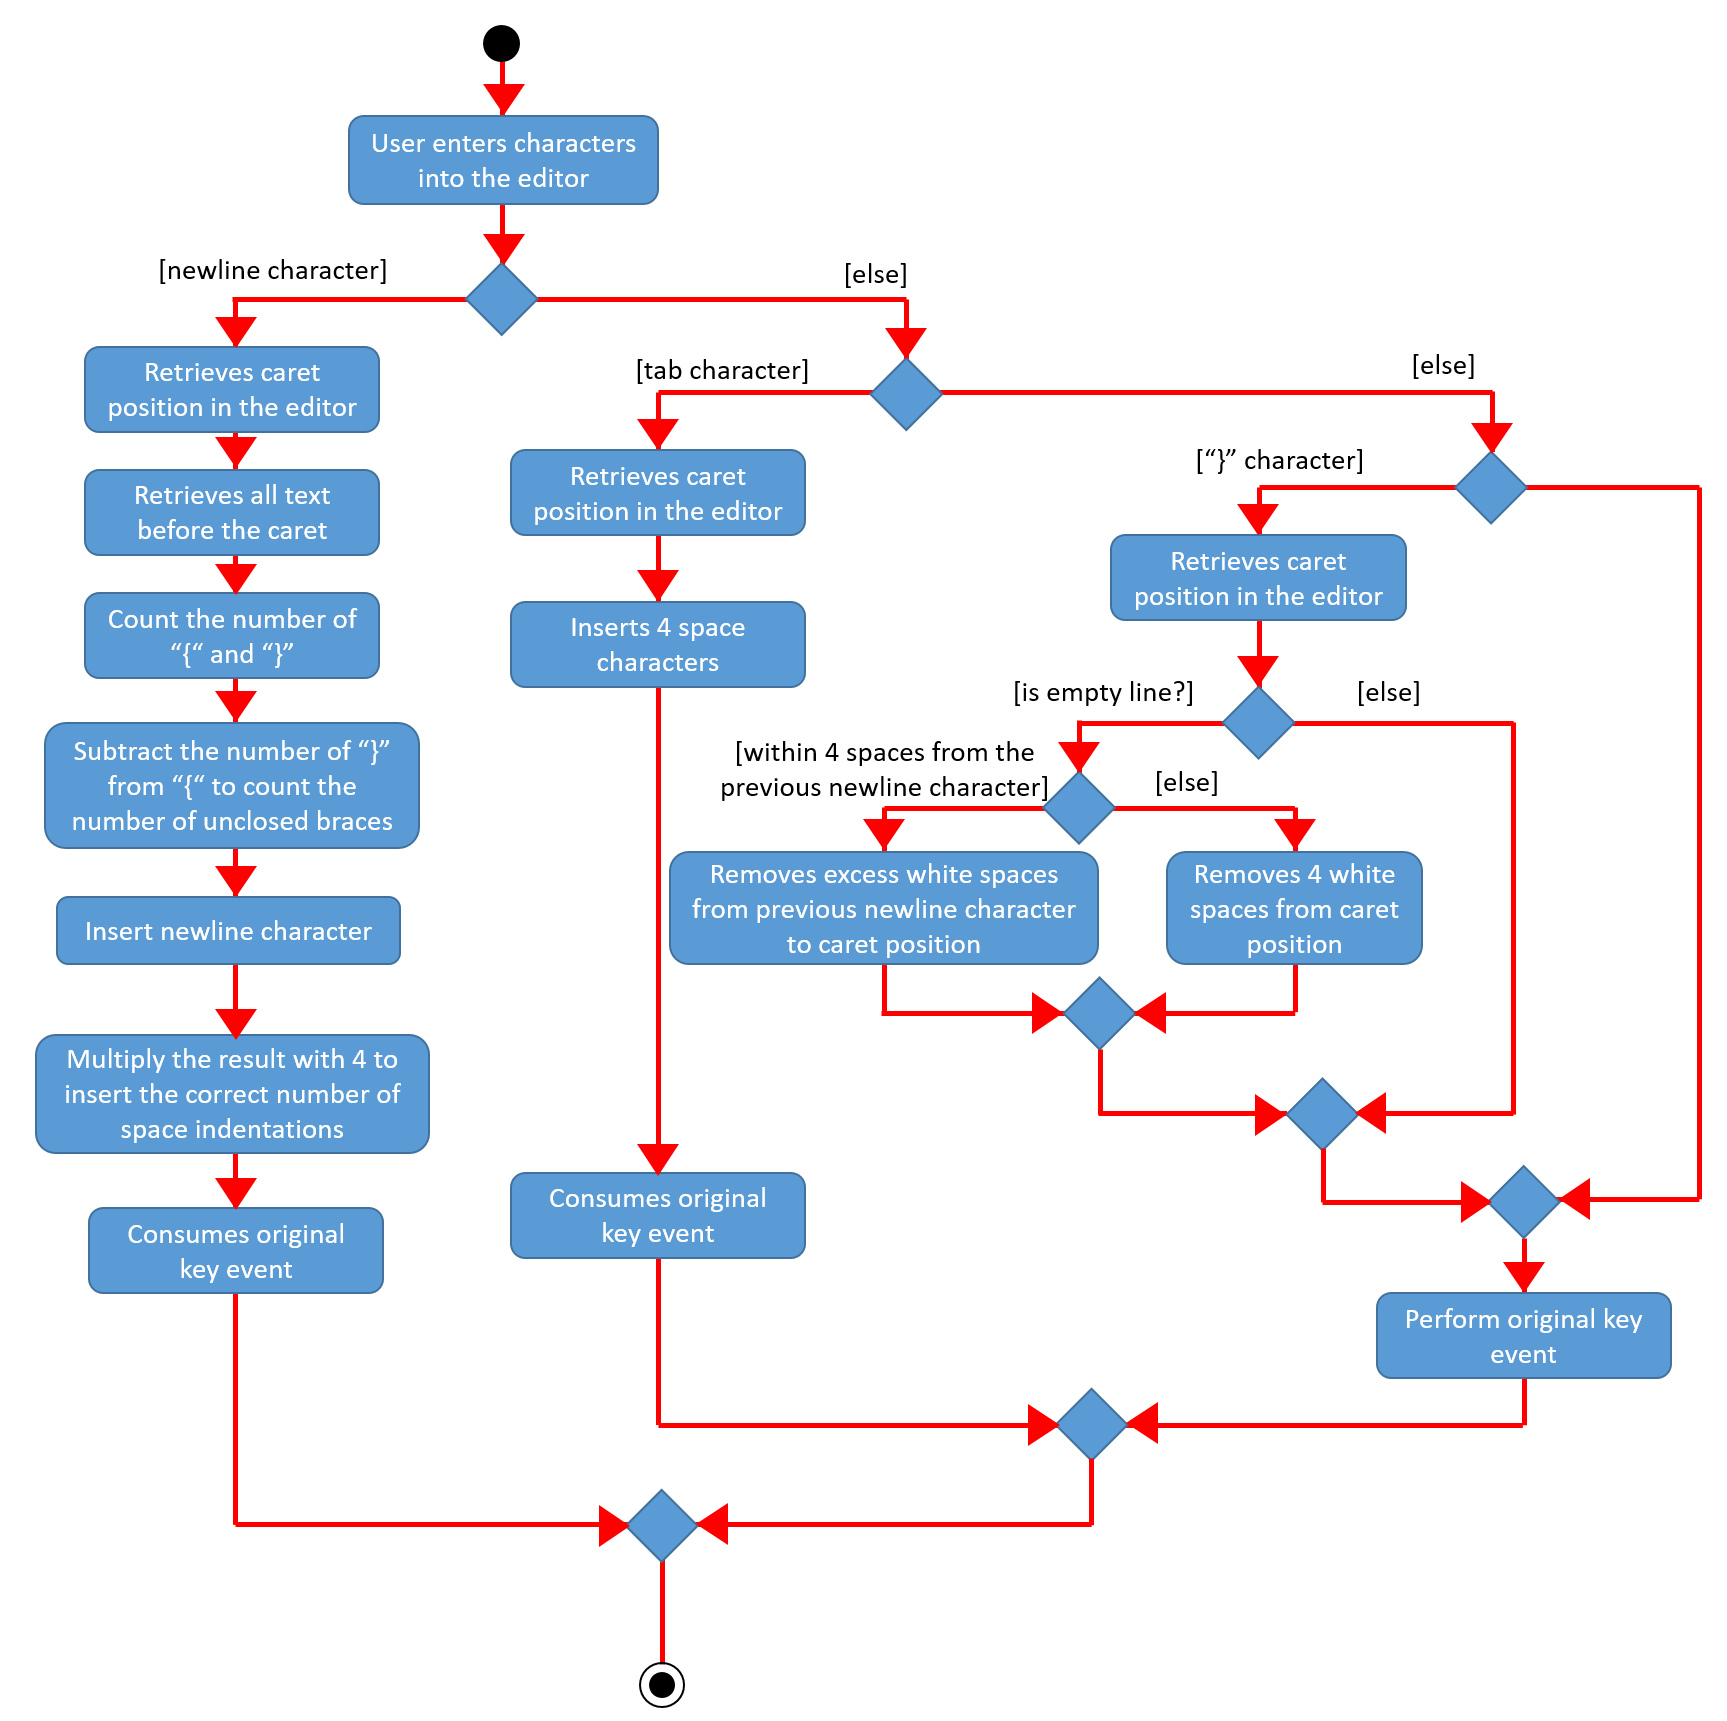
There are other modifications to key inputs to make the text editor imitate the behaviour of an actual IDE editor. These include overwriting the TAB key to input 4 spaces instead of 8, and also performing auto de-indentation when a right brace (i.e. "}") is typed. Refer to the activity diagram below for the possible outcomes.
-
For this implementation, we have used a onKeyRelease event to overwrite the function of the ENTER key.
-
We recognize that this implementation is not desirable as the auto-indentation is only performed only after the ENTER key is released. Meaning to say, if a character is typed while the ENTER key is held down, those characters will not be auto-indented.
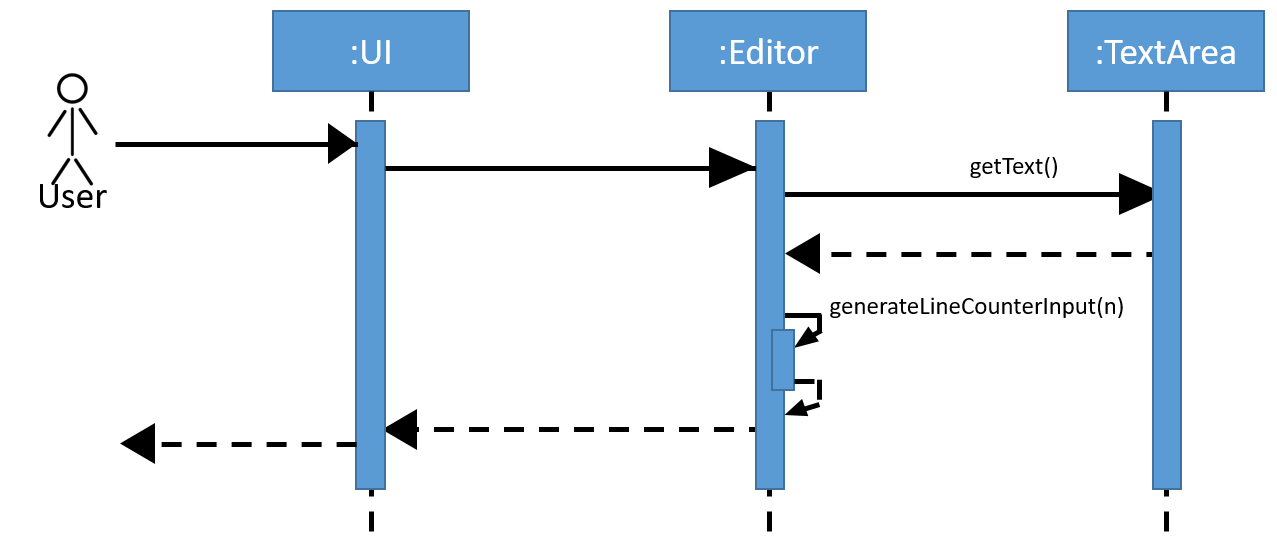
The line counter component of the editor keeps track of the number of lines written by the user in the editor. It takes
in a SimpleIntegerProperty and is updated automatically whenever there are changes to the text observed in the editor.
This is achieved through adding a InvalidationListener to the text property of the editor, along with using the
necessary helper functions to count the number of newline characters in the text. The Sequence Diagram below shows how
the UI interacts with the Editor class to generate the line counter in the text editor.
Design Considerations
Aspect: Overwriting ENTER key function
-
Alternative 1: Overwrite with onKeyPress event
-
Pro: The auto-indentation will behave exactly as intended.
-
Drawback: Due to a bug in JavaFX that could not be resolved, we decided to avoid this implementation.
If we were to choose to overwrite with onKeyPress event, the event will have to be consumed as anything specified in the onKeyPress event will be executed before the original key function is performed. However, the mentioned bug earlier causes the onKeyPress events to be executed twice. Which means, 2 newline characters will be inserted on a single press of the overwritten ENTER key. Because of this drawback, we decided to go for the alternative implementation.
-
-
Alternative 2 (Current Choice): Overwrite with onKeyRelease event
-
Pros: Avoids entering 2 newline characters with a single ENTER key press and auto-indention still works. OnKeyRelease events are executed after the original key function is performed. Thus, there is no need to include inserting a newline character in the onKeyRelease event, which avoids the issue faced by Alternative 1.
-
Drawback: The auto-indentation is not behaving ideally. As mentioned earlier, because the auto-indentation only happens after the ENTER key is released, characters typed while the ENTER key is held down will not be auto-indented.
-